Archive | Dessert RSS feed for this section

Seriously Chocolate Brownies

14 Jul

OLYMPUS DIGITAL CAMERA

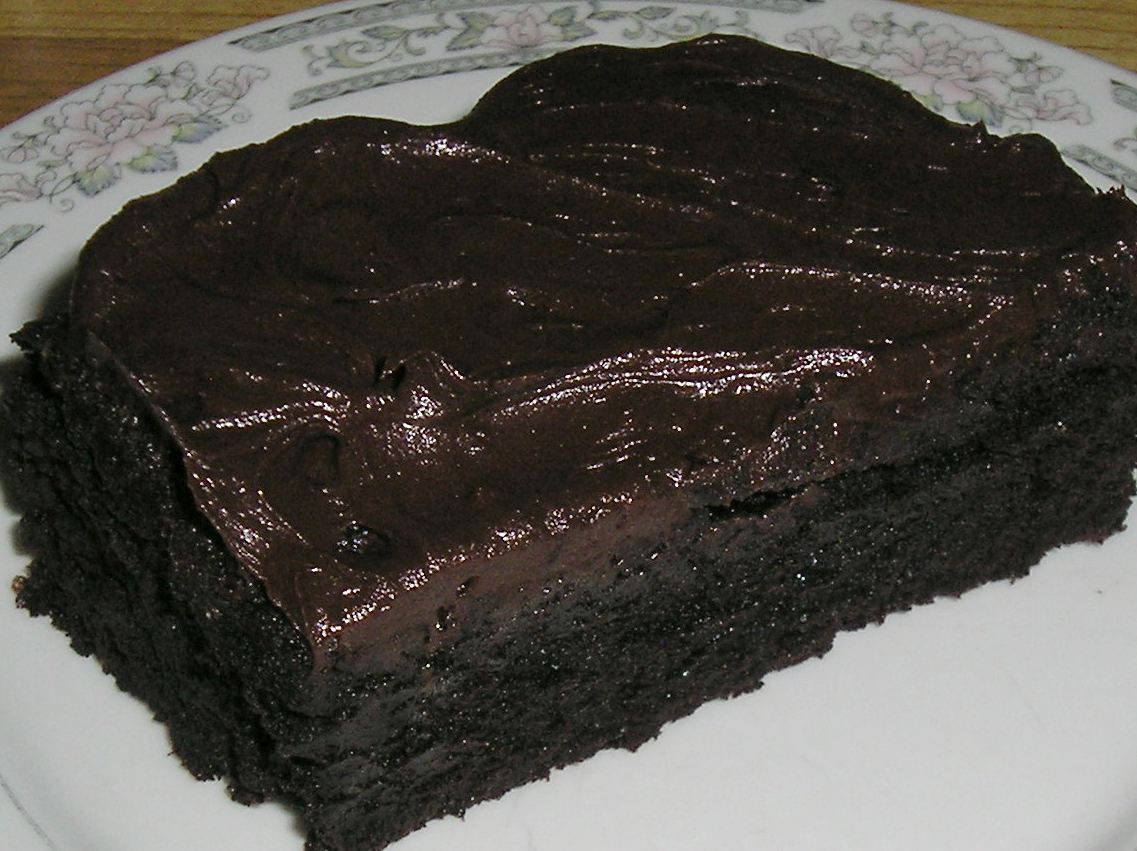
These chocolate brownies are for serious chocolate brownie lovers only.  They are not overly sweet as some brownies tend to be but they are extremely chocolate.  I make a flourless chocolate cake that is quite similar to these brownies.  I almost considered renaming them Blackies instead of Brownies!  If dense, fudgey and uber chocolate is your destination….look no further!  Preheat your oven to 300F.  Line an 8″ x 8″ square pan with parchment paper or tin foil.  If you use tin foil, leave enough hanging over the sides to make a handle for you to lift the brownies out.

Serious Chocolate Brownies

4 large eggs

1 cup each of brown sugar & white granulated sugar

1 cup of butter melted (salted or not)

1& 1/4 cups of the best quality cocoa powder you can get  your mitts on

1 teaspoon each of Pure Vanilla extract and Almond extract

1/2 cup of all purpose flour or cake flour if that is all you have

1/4 teaspoon salt (if using salted butter) OR  1/2 teaspoon salt if using unsalted butter

2 tablespoons strong coffee or instant espresso (optional)

Using your whisk attachment beat 4 large eggs at medium high speed until they are light and fluffy and pale in colour.  Add 1 cup of brown sugar and continue beating.  Add 1 cup of white sugar and continue beating (til no longer grainy 2 minutes).  Then add all the other ingredients beating after each addition.  Don’t forget to scrape down the sides of the bowl as well.  Bake for approximately 45 minutes.  The tester should come out with a few crumbs but not wet.  Do not over-bake or they will just be hard and then…well…that would just be sad ;-(

Classic Brownie Frosting

1 cup powdered sugar + 1/4 to 1/2 cup cocoa depending how serious you are about your chocolate
2 tablespoons butter softened to room temperature as in your finger leaves an indent not so soft it’s pooling
2 tablespoons milk or cream – any % is fine
1 teaspoon vanilla or espresso or coffee

I start mixing with a fork and then I take the hand-held beaters and beat until it is super creamy, fluffy and lighter in colour.  I do not like a lot of frosting on my brownies.  IF you do then double this recipe with the exception of the vanilla.  I would also suggest you only start with 2 tablespoons of milk and add a little at a time from there.  You can always add more milk but you can’t take it out once it is too much.  If it’s too late and you’ve already added too much milk STAY CALM ;-)   and just add some more icing sugar or cocoa.  If you prefer a more stiff icing add less milk, more creamy add more milk.  I like mine somewhere right in the middle.

You can also cheat and when the brownies come out of the oven throw a half a bag of chocolate chips (whatever kind you like) directly on top of the brownies.  Wait one minute while they become warm and start melting and then take your weapon of choice and spread it back and forth all over the top of the brownies.  You can then lick all leftover chocolate off of said weapon…because no one will ever know.  Let it cool before you slice into them.

The most challenging part about making these brownies is being able to wait until they are cooled before cutting them.  Your kitchen and most likely your entire house will smell like heaven.  Neighbours you’ve never met before will be coming out of the woodwork under the guise of saying hello.  Family members you haven’t seen for ions will suddenly be knocking on you do to ‘get re-acquainted’.  Don’t you believe it for a minute…they just want your brownies!  I don’t think these brownies could win a Nobel Prize but they could most definitely be a per-cursor to World Peace!

I am sorry dear reader for the lack of pictures but I am having technical difficulties these days.  I swear things of an electronic nature just hate me. lol  Today I thought I was making room for more pictures for my blog by cleaning out my media file…but nooooooo…I deleted pictures on my blog…I was going to cry but that won’t help so I ask you to please be patient while I try to restore said chaos here.

Double Vanilla Lovecakes with Classic Frosting

14 Jul

OLYMPUS DIGITAL CAMERA

I thought I’d start out this post with a little Lovecake cupcake song by two of my favourite songstresses Sophie Madeleine & Hannah Rei.  Enjoy!

There is nothing quite as blissful as a tiny little cake for one.  Just you and your favourite music, cup of tea or coffee, or maybe a good book and if you’re feeling very generous maybe even a friend to share in the bliss.  I like cupcakes because one is good but two is still justifiable 😉  So much more portable than an entire cake.

My cupcake of choice almost always involves chocolate but my friend’s daughter absolutely loves vanilla cupcakes only.  We’ve tried to convert her but she is having none of it!  I don’t care for vanilla so much but these Double Vanilla Lovecakes are just perfect.  So I made them and carted them off for my visit to the country and they received the thumbs up stamp of approval and only crumbs were left which is the best indicator of their deliciousness.

A good cupcake can’t be so fluffy and delicate that it can’t stand up to frosting.  Everyone knows the cupcake is just a vehicle for the frosting, right? 😉  A good cupcake must have excellent flavour, be easy to make and must yield consistently good results.  Now there are two schools of thought when it comes to domed versus flat or spread out cupcakes.  At our house if they don’t have a bit of a dome everyone thinks that they fell.  You make them as you wish.  The more full you fill the cupcake pan the higher the dome you will get.  I fill them just slightly over two thirds full.

I used to make my cupcakes by creaming the sugar and flour and then adding the wet and dry ingredients alternately and my mom always said you don’t need to do all that!  I never quite believed her but her baking always turned out perfectly.  Well apparently mom was right and ahead of her time!  There are bakers out there…award winning bakers and cookbook authors who are of the same school of thought.  This recipe for Lovecakes follows this exact premise.  Do not be afraid.  They are fabulous.  Have I lied to you yet?  Go on, try them.  They are irresistible man magnets….besties forever just because you are the best cupcake baker ever friendship bonders (is that a word?) and you will be the bake Queen, no scratch that…the Empress of the bake sale with these lovecakes.  If you show up with these sweet little ice breakers, people instantly love you!  Really!  It works every time 😉

Double Vanilla Lovecakes

1 & 1/2 cups of all purpose flour

1 & 1/2 cups of cake flour

1 cup of granulated white sugar

1/2 Tablespoon of Baking Powder

1/4 Teaspoon of salt (Kosher if you have it)

1/2 cup of butter unsalted or salted – not rock hard but not super soft and cube it into 1/2″ little cubes with a knife

4 large eggs

1 cup of milk – I used 2% but you can use whole (wouldn’t use skim)

1 teaspoon of Pure Vanilla Extract or 1/2 teaspoon each of Vanilla and Almond extract

Position a rack in the upper third of the oven and preheat oven to 325 degrees F.  Line 12-15 cupcake molds with paper liners and set aside.

In a stand mixer, fit with a paddle attachment put in all the dry ingredients and whisk them around.  In a separate measuring cup place all your wet ingredients.

Add butter cubes a few at a time while mixing on medium low speed.  You only want to coat each piece of butter with flour.  Then add wet ingredients to dry ingredients in three additions.  Scrape your bowl down well after every addition.  Beat until it’s mixed but do NOT over-mix it!  It will be a little liquidy and a little lumpy.

OLYMPUS DIGITAL CAMERAOLYMPUS DIGITAL CAMERA

Divide into the lined cupcake pan (about 2/3rds full for each cupcake) and bake for17-20 minutes depending on how hot your oven is (I check at 15) or until just starting to turn golden and a cake tester inserted in the center comes out clean.  Allow to cool in the pan for 5 minutes before removing to cool completely on rack before frosting.

Vanilla Frosting

1 cup powdered sugar
2 tablespoons butter -softened to room temperature as in your finger leaves an indent not so soft it’s pooling
2 tablespoons milk or cream – any % is fine
1 teaspoon vanilla
I start mixing with a fork and then I take the hand held beaters and beat until it is super creamy, fluffy and light in colour.  I do not like a lot of frosting on my cupcakes.  IF you do then double this recipe with the exception of the vanilla.  I would also suggest you only start with 2 tablespoons of milk and add a little at a time from there.  You can always add more milk but you can’t take it out once it is too much.  If it’s too late and you’ve already added too much milk STAY CALM 😉  and just add some more icing sugar.  If you prefer a more stiff icing add less milk, more creamy add more milk.  I like mine somewhere right in the middle.
OLYMPUS DIGITAL CAMERA

Coconut and Cardamom Crossover

6 Jul
Green Cardamom

            Green Cardamom

I have a secret…a secret addiction…I love cardamom…I love its heady & aromatic scent.  The flavour is quite complex, exotic and I am  hard pressed to describe it.   There isn’t anything quite like it.  It’s scent is deeply layered; floral, citrus with a refreshing eucalyptus note.  For me, it transforms the everyday into the exotic.  Ten of the green pods will yield enough seeds to produce about ½ teaspoon of ground heaven. As always, store pods, seeds or the ground spice in a cool, dark, dry place.

There are two varieties of Cardamoms: Green pod, and Brown pod.  Green pod Cardamom are smaller (about half the size of Brown color pods). Green pods have a much stronger flavor than the brown pods.  Green pods are used in making Garam Masala Chai (Hot tea latte). Green pods in India are comparable to Vanilla pods in Western cuisines and used to flavour desserts.  The brown pods are basically used in making Indian Curries and Biryani.   After the cooking is done, the pods should be removed.

I love it in my cakes, cookies, iced coffee, Basmati rice, icecream, and coffee cake.  I can’t think of too many things I wouldn’t like it with.  Sometimes I’ll even just chew on the seeds.  They release the most delightful and pungent burst of flavour on your tongue.  Like coriander, it is a definite acquired taste.  I also love coriander!  I only ever use fresh pods.  Yes, it may be a little more work but it is so worth the effort in flavour.

I like to just take whatever I have handy and gently but firmly push down until the pods open.  I have used my cast iron skillet to any old pot to the back of a knife (carefully).  If you smash them they will just go flying everywhere.  Then pick the pods out.  For custard we do not need to crush them as they will be infused into coconut milk.  You could even just open the pods and throw pod and seed into the milk if you have a fine enough sieve to strain them through later.

fresh cardamom seeds

              fresh cardamom seeds

I tried to use my lemon reamer and it did work to a certain extent but didn’t get them all so it was just as easy to squish them with iron skillet  😉

I have scalded coconut milk (1 can) plus 2 cups of 2% milk in the microwave for about 3 or 4 minutes but you can use full fat milk or even cream if you wanted to.  I wouldn’t recommend skim, you just won’t get the creamy flavour you need in a custard.  You could also do this on a pot on the stove over medium heat.  You know it’s scalded when tiny little bubbles appear around the perimeter and it is steaming.  You are now going to add your cardamom and set it on the counter to cool.  I always use my Pyrex heat-resistant measuring cup to make this because then I just have to pour it into the serving bowls and Bob’s your uncle!

After the milk has cooled down so it’s just barely warm to the touch, cover it and place in the fridge.  I left mine overnight and part of the next day.  The longer you leave it the more intense the flavour will become.  Now we are ready to make the custard.

You can do this over medium heat on the stove stirring constantly or you can use the microwave on the high setting and stir in one minute increments for about 6-8 minutes.  The last two minutes I actually check every 30 seconds because it happens fast and you have to watch it.  You don’t want it to be too thick like over cooked porridge – that will just bring tears – and well, that just wouldn’t be attractive at all  ;-(

Coconut and Cardamom Custard 

1 can coconut milk (they only come in one size at my store – 14oz)

2 cups 2% or full fat milk or 35% cream

4 Extra Large Eggs or 6 Small Eggs or 8 Egg Yolks only (save the whites for an omelet)

1/2 cup of white granulated sugar (you may add up to 1/2 cup more if you like sweeter)

1 Tablespoon butter (salted – if you use unsalted add a pinch of salt to milk)

1 Teaspoon Pure Vanilla Extract (optional)

2 Level Tablespoons of Cornstarch + 2 Level Teaspoons (or flour)

* Please note that this is a double recipe so you can easily halve it if you so desire.

Directions for Microwave

Whisk your eggs and sugar until very pale and all the sugar is dissolved then add your flour or cornstarch making a thick, smooth paste and gradually add your strained milk and salt (but only if you are using unsalted butter).  Add the  vanilla and the butter at the very end and stir well.

Put in the microwave uncovered for 2 minutes.  Take it out and whisk it.  Then back in the microwave in one minute increments, stirring between each minute.  Do this for about six to eight minutes until it is thickened.  Remember it will thicken more as it cools so don’t let it get too thick.  When it is ready remove from microwave and add one tablespoon of butter and 1 teaspoon of  vanilla  extract if you are using it- mix in well.  Take a piece of plastic wrap or baking paper and lay it directly over top of the hot mixture.  Make sure it touches the top and completely covers  it.  This will prevent a skin from forming on the top.  However, if you like the thick skin that forms, than by all means don’t bother yourself.  Put in fridge until you can no longer resist or wait.  I personally prefer mine room temperature to warm.  I think the flavour comes through better when it is tempered.

Directions for Stove Top

Have eggs ready in a bowl, and set aside where it will be within reach.Using a whisk, combine strained milk (discard cardamom pods), sugar and cornstarch in a medium saucepan over medium heat on stove top. Allow milk to scald (heat to the point when tiny bubbles form around edges of pan). Whisk occasionally to prevent cornstarch or flour from clumping on bottom edges of pan.

Remove milk mixture from heat

Mix about 3 tablespoons of scalded milk mixture into eggs using whisk, then introduce eggs into milk mixture in a slow stream, whisking milk mixture constantly.

Immediately return pan to heat and whisk gently until custard thickens, another two or three minutes. Do not allow to boil. (If you find that you have egg white strands in custard, try passing it through a fine-mesh sieve into a different bowl or you could even try blending it smooth).

Remove pan from heat and stir in butter and follow direction above with plastic wrap and cooling.
Serve with

This would be nice served with a plain pound cake or a sugar cookie or a coconut or ginger cookie and would be fabulous with fresh strawberries or passion fruit.
Alas, dear reader I have searched and searched and can not believe that I have accidentally erased the money shot of the beautiful end result of all my labour!  I already ate the pudding (and shared some with a very lucky sister).  Please don’t judge me 😉  But I do have a lovely photo for you of exactly what yours should look like.
Cardamom Custard with a smattering of pistachios.  You could also do almond slivers toasted.

Cardamom Custard with a smattering of pistachios. You could also do almond slivers toasted.

Please do try this.  It’s super simple, quick and easy and tastes far superior to any boxed or ready-made versions you can buy.  You can change-up the flavours however you fancy too.  Almost anything your imagination can conjure up.  Good luck and drop me a line.  I love hearing back from you.

Luscious Lemon Bars

26 Jun
Pucker Up Butter Cup!

Pucker Up Butter Cup!

As you may already know I am a lover of all things lemon.  The more tart, the better I like it.  I’m addicted and can’t get enough!  I made these bars for my father for Father’s Day instead of the traditional Butter Cream Torte or Black Forest Cake that we usually do.  I’ve been buying lemons by the bag lately and have no problem using them all up.  This recipe is an adaptation of the Contessa’s.

OLYMPUS DIGITAL CAMERA

First things first, using my handy dandy microplane rasp I grated six medium-sized lemons.  Give them a good scrubbing first and then I like to cut off each end prior to zesting.  Zest on the finer grater or you will end up with too large pieces in your filling and it’s not the nicest thing to bite into.  If you don’t have a rasp just use a regular grater.  If you are not careful you can also create a  huge pile of knuckle skin and this is not nearly as appetizing as say a pile of lemon, orange, lime zest or a huge pile of Parmesan, garlic or ginger.  If you do not own one of these RUN don’t walk to the nearest hardware store-yes- hardware store.  It’s cheaper to buy one at the hardware store than at the kitchen store.  You can thank me later 😉

OLYMPUS DIGITAL CAMERA

Zesting lemons …smells so good!

Now we are going to juice all the lemons.  You can use a traditional juicer, a reamer, or my favourite; what I refer to as the lemon annihilator.  Why do I prefer this one over the others?  Truth?  Laziness!  You put the lemon  half in, squeeze all the juice out and the seeds stay put!  What, I ask, is not to love about that 😉

juicer citrus reamer

You can squeeze all that lovely juice out right over your measuring cup.  You can see why I refer to it as the annihilator!  There is nothing left of them!

OLYMPUS DIGITAL CAMERA

Now let’s prepare the base.  It’s super simple, basically just a short bread.  It is quite soft and sticky so if you don’t want your hands to stick just flour them or use the back of a floured measuring cup like I did.  You can also use surgical gloves which I often have in the kitchen for these situations or skinning chicken etc.

OLYMPUS DIGITAL CAMERA

Ready for the oven

Ready for the oven

Push the base half way up the sides of the dish and put it in the freezer or fridge for about 10 minutes then pop in the oven and bake at 350F for about 20 minutes.  Remove and let cool.

While this is cooking we can make our filling.  Now don’t panic when you see your filling.  It is very liquid in texture like soup but it will thicken in the oven.  You may want to place your pan on a cookie sheet in case it flows over.  I actually ended up adding a little more flour.  It all depends on how you like your lemon filling.  The first day it was creamy and lovely and the second day it was almost like a thick lemon curd so I’m not sure if it was the humidity or because I didn’t cover it overnight (I was afraid it would get too wet and ruin the crust) or my addition of flour but it still tasted delicious it was just thicker in texture.

Lemon Squares

Lemon Squares

It must have been good because my sister had seconds and my father had thirds!  As you can see in the photo, the perimeter of my crust was quite golden.  If you do not like this just cut it off all the way around.  I personally think it’s the best part so those spoils go to the chef! 😉

TIPS

You could make this with limes and a ginger cookie crust with a toasted coconut top if that floats your boat.

Crust:

1/2 pound or 1 cup of butter, at room temperature
1/2 cup granulated white sugar or icing sugar
2 cups flour (all-purpose or cake & pastry) or half rice flour/half regular flour
1/8 teaspoon salt (if using unsalted butter)

Filling:

6 extra-large eggs at room temperature
3 cups granulated sugar (I only put 2 1/2 cups)
2 tablespoons grated lemon zest (4 large to 6 medium lemons)
1 cup freshly squeezed lemon juice  (4 large to 6 medium lemons)
1 cup flour
Confectioners’ sugar, for dusting

Directions

Preheat the oven to 350 degrees F.

In the bowl of an electric mixer fitted with the paddle attachment, cream the butter and sugar until light . Combine the flour and salt and, with the mixer on low, add to the butter until just mixed. Dump the dough directly into pan you are going to bake it in. You don’t need to butter it as it is so short it will not stick at all.  Flatten the dough with floured hands or the back of floured measuring cup and press it into a 9 by 13 by 2-inch baking sheet, (I used a smaller size as I like a thicker crust) building up a 1/2-inch edge on all sides. Chill.

Bake the crust for 15 to 20 minutes, until very lightly browned. Let cool on a wire rack. Leave the oven on.

For the filling, whisk together the eggs, sugar, lemon zest, lemon juice, and flour. Pour over the crust and bake for 30 to 35 minutes, until the filling is set. Let cool to room temperature.

Cut into bars,rectangles, squares or triangles and dust with confectioners’ icing sugar after they have completely cooled.   You could skip this step if you wanted to but the sweetness is a nice contrast against the tartness of the lemon.

I love to hear from you so please let me know how your lemon squares turned out.  Just be prepared to make them from now on because anyone with whom you share them will always want you to bring them to every occasion.  Enjoy!

Melt in Your Mouth Butter Tarts

14 Jun
Butter Tarts

Butter Tarts

Today’s posting is dedicated to the memory of my Mother.  This June 16th, 2013 marks the first year of her passing.   These butter tarts are my Mom’s recipe.  She was FAMOUS – we are talking seriously famous for her butter tarts during her life time.  Her butter tarts were so good that ex-boyfriends would risk a daughter’s wrath and return to the scene of their crime for them (I kid you not!).  My brothers would have chained her to the oven if it would have ensured a non-stop supply of these babies (or her cinnamon rolls).   Mom’s melt in your mouth crust was always so short, flaky and golden brown and the filling was solid not runny and had just enough raisins.  My mouth is watering LOL.   Every special occasion these were made as part of her baking repertoire.  If she hadn’t made them when we weren’t around and frozen some- there would never have been any left for said special occasion!  Mine can’t touch Mom’s but they are pretty darn close thanks to her recipe.  Love you Mom!

I share this recipe with you today dear reader in hopes of spreading a bit of the love my Mom shared with us through  her kitchen and her butter tarts.  I hope you enjoy them as much as we all did and continue to do so.

I would also, at this time, like to give a nod to my friend Jimmy!  A gourmand in his own right.  I positively adore a man who not only knows his way around a kitchen but who loves to eat!  Jimmy loves butter tarts and I promised him I would post the recipe here.  So here it is, enjoy my friend!

How do you like your butter tarts?  Ooey-gooey? Firm and chewy? Raisins? No Raisins? A mix of dates, currants and raisins?  Some chopped pecans? A little bitter sweet chocolate on the bottom of the crust? Thick crust or thin?  Lots of filling or not so much?  I hope you decide to make them and that they become one of your favourites and a regular in your baking repertoire as well.  Drop us a line and let us know how your butter tarts turned out.  I can hardly wait to hear all about it 😉

Hollie’s Pastry Dough

*makes two open-faced pies or one pie with a lid or 12 tart shells depending on the size of your tin

21/2 cups of flour  (350 grams all-purpose flour or 325 grams of cake/pastry flour)

1/2 pound of butter  (226.80 grams {g / butter})  (or a mixture of butter and vegetable shortening.  I’m an all butter girl myself)

1/4 cup  (60 ml)  cold water (ice or tap)

Mix the flour and butter with a pastry blender, fork or your hands.  If using your hands and they are very warm  just run them under cold water for a minute and dry well before handling the mixture.  Leave some nice chunks of butter in the mix for a flaky crust.  Add 3 tablespoons of water and mix.  Keep adding water a tablespoon at a time until the mixture forms a ball. Sometimes depending on the weather or the heat in your kitchen you may need more or less water, that is why you add it a tablespoon at a time after the initial first 3 tablespoons.  It’s much easier to add gradually then add to much water and try to fix it.

OLYMPUS DIGITAL CAMERA

Shape into a disk and wrap in plastic wrap and put in fridge for 20 minutes.  Flour your work surface and start rolling your dough.  You can also roll it between parchment or plastic wrap for easier clean up.

Butter Tarts

Butter Tarts

Once it’s all rolled out you can start cutting your dough.  Remember to make them big enough to be able to go all the way up the sides of the tin and put your filling in.  I always cut one first and try it in the tin before cutting all of them.  Measure twice and cut once rather than having to re-roll all your dough.  Say that ten times quick  😉  Roll it out about 1/4″ thick.

I used a fluted edged cutter but you can use a clean tin can, a big mug or cup.  I have even been known to trace a smaller plate with a knife.  Necessity is the mother of invention.  Whatever gets the job done!

I’ll let you in on a little secret too.  I always take my tray of uncooked tart dough and I put it in the fridge or freezer until I’m done making my tart filling.  Why you ask?  When the cold pastry (butter) hits the hot preheated oven it creates steam in the pastry causing it to puff up and become lovely and flaky.  Would I lie to you?  Never!

I do apologize dear reader, it would seem I forgot to take a picture of the tart filling for you ;-(    Truth be told it was not all that exciting and the process is fairly straightforward.

The Filling

2 Extra Large Eggs or 3 Large Eggs

2 cups of lightly packed brown sugar (any kind you like; golden, dark brown, etc.)

2 tablespoons white vinegar (I think lemon juice would be permissible in a pinch)

1 teaspoon Pure Vanilla Extract

1/2 cup butter (measured and then melted)

Optional; 1&1/3 cups red currants, or chopped or not chopped raisins; or chopped dates or chopped figs or chopped pecans OR a mixture of all of them to 1& 1/3 cups in total measure.  You can even make them without anything but the brown sugar mixture which I have been known to do on occasion.  The addition of vinegar cuts the sweetness of the filling but if you really like a sugar coma you can leave it out as well.  For a uber special treat, some bitter sweet chocolate at the base, just a tablespoon or two.  Just melt some bitter sweet chocolate (chips or baking chocolate) in the microwave at one minute intervals.  Stir between each minute and watch carefully not to scorch because it can’t be fixed.

Place the butter in a pot on the stove or in a microwaveable measuring cup and melt it.  When it’s melted add all the other ingredients and heat on medium heat until the sugar is completely dissolved.  Stay with it and stir it constantly unless you like burnt brown sugar bits in your tart  😉  If you are making it in the microwave just stir it in one minute increments.  It shouldn’t take more than 4 minutes tops.

Take your prepared tart shells out of the fridge and fill them one-third to halfway with the butter tart filling.  I do not recommend filling past this point because they will bubble up and over when baking.  Place in a preheated 450F oven for the first 10 minutes, then turn down to 350F for 20-25 minutes.  My oven is very hot so I bake them at 350F for the entire time and if you like them a little more crispy or golden brown then just bake them a few extra minutes.  Let them cool in the tin for 10 minutes and then either turn them on their sides or remove them from the tin to finish cooling on a rack.

I do hope that you will try making these.  I know you will be blushing from all the ‘oohs’ and ‘aaahhs’ and ‘mmmms and smiles you will be cultivating.  The neighbours will be making up excuses to come over because of the amazing aroma wafting out of  your kitchen tantalizing their taste buds and driving them insane.  Bet you no one can eat just one!

Butter Tart Nirvanah

            Butter Tart Nirvana

Please enjoy responsibly lol and please leave a comment, message, thought below.  I love to hear from you 😉